Create and Manage Deployment Using Declarative Approach
Let's see how you can create and manage Kubernetes Deployments declaratively.
Here is the Docker Image used in this tutorial: reyanshkharga/nginx
Step 1: Create Deployment Manifest
First, we need to write the Deployment manifest as follows:
Required fields:
apiVersion- Which version of the Kubernetes API you're using to create this object.kind- What kind of object you want to create.metadata- Data that helps uniquely identify the object, including a name string, UID , and optional namespace.spec- What state you desire for the object.
You'll notice that the YAML configuration for the Deployment looks very similar to the ReplicaSet, with the exception of the kind attribute.
Step 2: Create Deployment
Let's use kubectl apply to apply the manifest and create the Deployment:
Step 3: List Deployments
List Deployments and verify that the deployment we created is available:
Step 4: View ReplicaSets Created by the Deployment
As discussion earlier, when you create a Deployment, kubernetes creates a ReplicaSet for you and manages the replicas of your application based on the Deployment's desired state.
Let's list the ReplicaSets created by my-deployment:
You'll see a ReplicaSet created and managed by the Deployment.
The name of the ReplicaSets created by Deployments starts with the deployment name.
Step 5: View Pods Created by the Deployment
List pods:
You'll see pods created and managed by the Deployment.
The name of the pods created by Deployments starts with the deployment name.
Step 6: Describe the Deployment
Describe the deployment:
Step 7: Scale the Deployment
Let's scale replicas to 3:
You can also use kubectl edit command to scale the Deployment as follows:
- Set the editor you want to use (Default is vim):
- Edit the YAML manifest by changing the value of replicas to a desired value and then save file to scale the deployment:
Verify that the deployment was scaled:
# List deployments
kubectl get deployments

# List replicasets
kubectl get rs | grep my-deployment

# List pods
kubectl get pods | grep my-deployment
Step 8: Update the Deployment
Let's update the deployment to use a new image reyanshkharga/nginx:v2.
In the Deployment YAML manifest change the value of image to reyanshkharga/nginx:v2.
Now, apply the manifest to update the deployment:
Step 9: Verify if the Deployment Was Updated
Verfify the Deployment, Pods, and ReplicaSets:
# Describe deployment
kubectl describe deploy/my-deployment

# List pods created by the deployment
kubectl get pods | grep my-deployment

# List replicasets created by the deployment
kubectl get rs | grep my-deployment
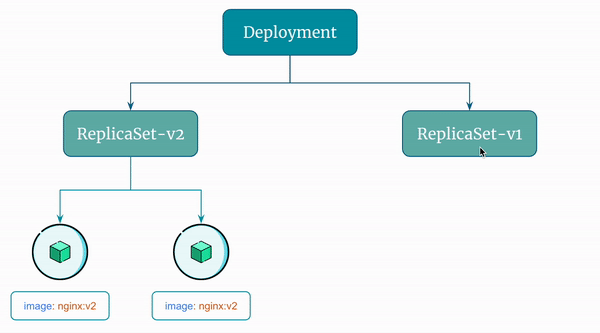
You'll notice the following:
- The Deployment is updated and uses the updated image.
- A new ReplicaSet is created
- New Pods come up and old Pods are terminated.
- Old ReplicaSets are not deleted (unless this was 11th revision)
Here's a visual representation of the rolling update described above:
Step 10: Update the Deployment Few More Times
- Change the image to
reyanshkharga/nginx:v3and apply the configuration again. - Change the image to
reyanshkharga/nginx:v4and apply the configuration again.
Step 11: List Deployment Revisions
As discussed earlier, Kubernetes Deployment controller stores up to 10 revisions of a Deployment.
You can configure the maximum number of revisions to keep by setting the .spec.revisionHistoryLimit field in the Deployment's YAML file.
List the Deployment revisions:
Get the details of a particular revision:
List ReplicaSets managed by the Deployment:
Step 12: Rollback the Deployment
Rollback to the previous version:
Verify rollback:
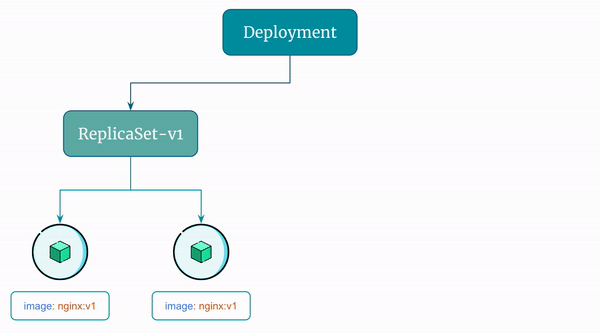
You'll notice that the pods are now managed by the replicaset from previous revision.
You can also rollback to a particular version as follows:
Verify rollback:
Here's a visual representation of the rollback flow described above: