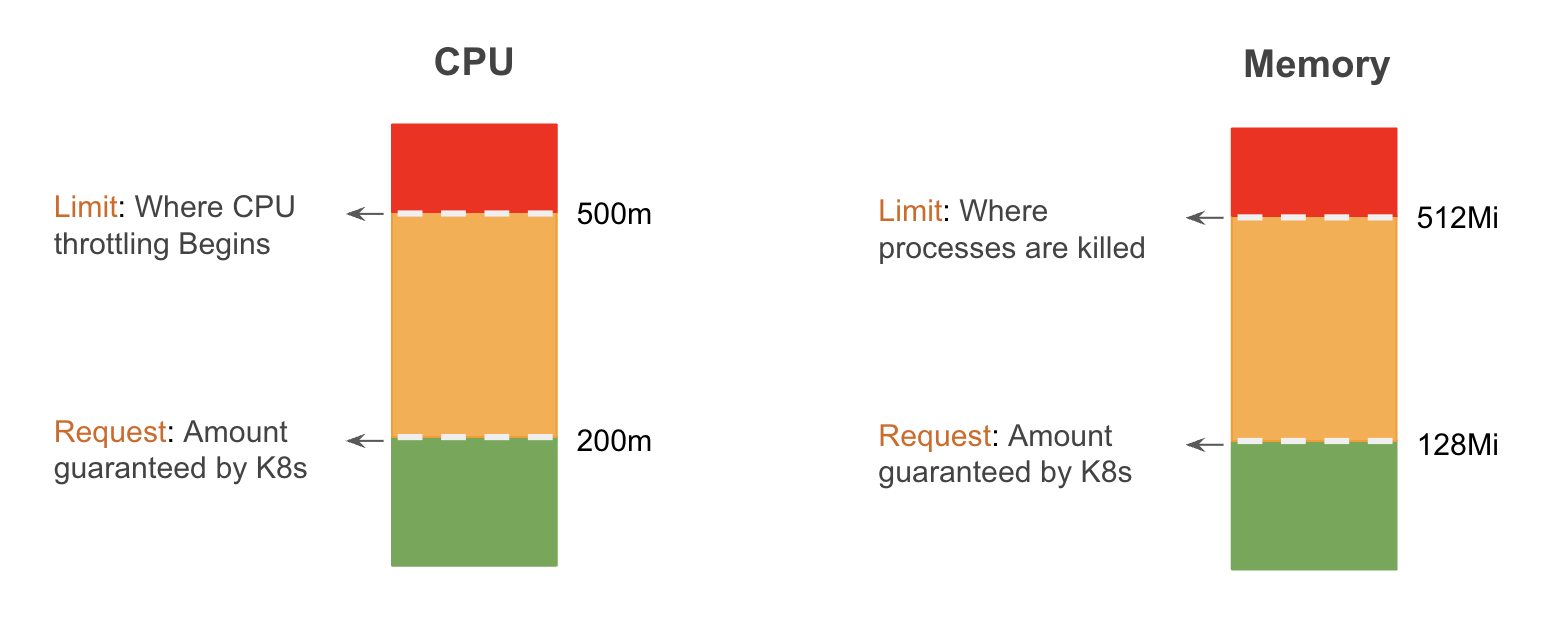
Introduction to Requests and Limits
By default, containers run with unbounded compute resources on a kubernetes cluster.
When you create a pod, you can optionally specify how much of each resource a container needs. The most common resources to specify are CPU and Memory.
When you specify the resource request for containers in a pod, the kube-scheduler uses this information to decide which node to place the pod on.
When you specify a resource limit for a container, the kubelet enforces those limits so that the running container is not allowed to use more of that resource than the limit you set.
The kubelet also reserves at least the request amount of that system resource specifically for that container to use.
If the node where a pod is running has enough of a resource available, it's possible (and allowed) for a container to use more resource than its request. However, a container is not allowed to use more than its resource limit.
Unit of CPU and Memory Resources
In kubernetes, CPU resources are defined in m which stands for millicores. If your container needs two full cores to run, you would put the value 2000m. If your container only needs one fourth of a core, you would put a value of 250m.
In kubernetes, Memory resources are defined in Mi which stands for mebibytes.
Megabyte and mebibyte are close in size. (1 Mi = 1.048576 MB).
Requests and Limits - An Example
Suppose you allocate a memory request of 256 MiB to a container within a pod that is scheduled to a node with 8GiB of memory, and there are no other pods on that node. In such a scenario, the container has the flexibility to utilize more RAM if necessary.
However, if you set a memory limit of 4GiB for the same container, the kubelet (along with the container runtime) ensures that the limit is enforced. The container runtime takes measures to prevent the container from exceeding the specified resource limit.
For instance, if a process within the container attempts to consume more memory than the allowed limit, the system kernel terminates that process, triggering an out of memory (OOM) error.
Tip
You can use kubectl top command to view memory and CPU usage of a pod. But you need to install metrics server before you can use the kubectl top command.
Choosing CPU and Memory Requests and Limits
To determine the appropriate amount of CPU and Memory requests and limits for a pod, consider the following factors:
-
Resource Requirements
Analyze the application's resource needs, such as CPU usage and memory consumption, based on its workload patterns and expected traffic. This information helps in determining the initial
requestsandlimits. -
Performance and Scalability
Set CPU and memory
requeststo ensure the pod has enough resources to function properly. Consider the workload's scalability requirements and potential resource spikes to define appropriatelimits. -
Monitoring and Analysis
Continuously monitor the pod's resource utilization and performance metrics. Adjust the
requestsandlimitsbased on observed patterns and bottlenecks to optimize resource allocation. -
Testing and Validation
Conduct testing and performance profiling to validate the chosen CPU and memory settings, ensuring they meet the desired performance and stability requirements.
By considering these factors and regularly assessing the pod's resource utilization, you can determine the correct amount of CPU and Memory requests and limits to optimize performance and resource allocation.
References:
