Dynamic Provisioning of Persistent Volume Using EBS
Let's create a StorageClass that specifies the properties of the storage that will be dynamically provisioned for a Persistent Volume.
Observe the following:
- The
EBS CSI Driveris used as the provisioner to provision EBS volume dynamically - The
parametersfield specifies the properties of the storage provisioned - We have set the
reclaimPolicytoDelete. This means that the EBS volume will be deleted when the associated Persistent Volume is deleted. - The
tagSpecification_<i>is used to specify the tags of EBS volume that will be provisioned
For the ebs.csi.aws.com (EBS CSI Driver) storage provisioner, the following are some of the additional fields that can be added to the parameters field:
fsType: The file system type to use for the volume. For example,ext4orxfs.encrypted: A boolean value that indicates whether to create an encrypted volume. Default isfalse.kmsKeyId: The ID of the KMS key to use for encryption. This field is only used if encrypted is set totrue.iopsPerGB: The number of IOPS per GiB for the volume. This field is only used for specific volume types, such asio1.throughput: The throughput inMiB/sfor the volume. This field is only used for specific volume types, such asgp3.
You can check the documentation of the specific storage provisioner you're using to see what other parameters can be added to the parameters field.
The volumeBindingMode field in a kubernetes StorageClass object specifies how PersistentVolumeClaims (PVCs) should be bound to PersistentVolumes (PVs) when using this StorageClass.
The possible values for the volumeBindingMode field are:
Immediate: The PVC is bound to a PV as soon as it is created. This is the default value.WaitForFirstConsumer: The PV is only bound to a PVC when a pod using the PVC is scheduled to a node. This is useful when resources are scarce and you only want to provision storage when a pod is actually using it.
In summary, if the volumeBindingMode is set to Immediate, the PV will be created immediately and bound to the PVC. If the value is set to WaitForFirstConsumer, the PV will be created only when a pod using the PVC is scheduled to a node.
Apply the manifest to create StorageClass:
List and verify StorageClass:
Note
This won't provision any EBS volume. The StorageClass only specifies the property of the EBS volume.
Step 2: Create a Persistent Volume Claim (PVC)
Now that we have a StorageClass created, we can create a Persistent Volume Claim (PVC) that will provision the Persistent Volume (PV) dynamically.
Create PVC as follows:
Observe the following:
-
The PVC uses the StorageClass
my-scand, therefore, the storage that will be provisioned dynamically will have the properties defined inmy-sc. -
The access mode is set to
ReadWriteOnceand, therefore, the PV that will be created will have the access mode set toReadWriteOnce. -
The storage that will be provisioned dynamically will have
5Gistorage available.
Apply the manifest to create the Persistent Volume Claim:
Once the PVC is created, the following actions are automatically taken:
- A new EBS volume will be provisioned
- A PV will be created that references the newly provisioned EBS volume
- The PVC is bound to the newly created PV
Please note that if the volumeBindingMode field in the StorageClass (my-sc in this case) used by the PVC is set to WaitForFirstConsumer, the EBS volume and PV will not be created until a new pod that uses the PVC is scheduled on a node. But in this case we have set it to Immediate and, therefore, the EBS and PV will be created as soon as the PVC is created.
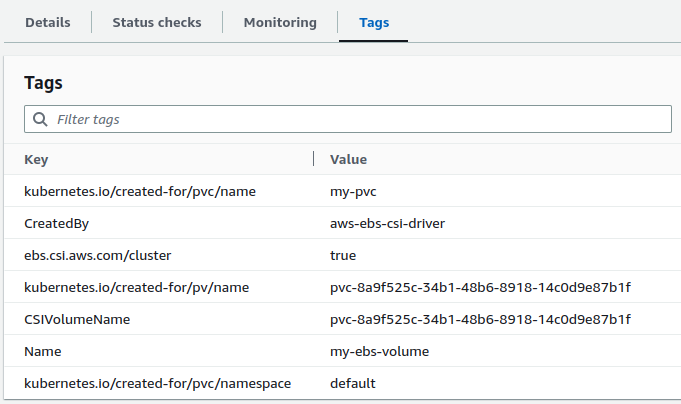
Go to AWS console and verify the newly created EBS volume. Check for tags that was used in StorageClass definition. The EBS volume will also have additional tags indicating that it was dynamically provisioned using the EBS CSI driver.
Also, the Amazon EBS volume state will be Available. The status will change to in-use only when the EBS volume is mounted on a worker node.
Verify the Persistent Volume Claim (PVC):
Verify the automatically created Persistent Volume (PV):
# List PVs
kubectl get pv

# Describe PV
kubectl describe pv <pv-name>

# View PV in yaml format
kubectl get pv <pv-name> -o yaml
Check the VolumeHandle field. You'll find that it references the newly created EBS volume.
Step 3: Create Pods That Uses the Persistent Volume Claim
Let's create pods that uses the Persistent Volume Claim we created in the previous step. We'll use a deployment to create pods:
Obeserve the following:
- The deployment creates pods with 1 replica
- The pod has one container named
nginx - A volume named
my-volumeis created using the PVCmy-pvcwe created in the previous step - The volume
my-volumeis mounted on/my-datadirectory of thenginxcontainer
Apply the manifest to create the deployment:
Verify the EBS volume state in AWS console. You'll observe that as soon as the pod is scheduled on a node, the EBS volume is mounted on that node and the state changes from Available to in-use.
You can see the Attached instances field in the EBS details section in the AWS console.
Note
In the deployment described above, if the number of replicas is set to a value greater than one, only one pod will be created and scheduled due to the limitations of EBS volumes, which cannot be mounted on multiple nodes and, therefore, multiple pods.
This limitation can be overcome by using StatefulSets, which allow for dynamic provisioning of storage for each pod in the deployment, ensuring that each pod has its own unique storage that persists even if the pod is terminated or rescheduled.
Step 4: Verify Deployment and Pods
Step 5: Verify Volume Mount and Data
-
Open a shell session inside the nginx container:
-
View data:
Step 6: Delete the Deployment and Persistent Volume Claim (PVC)
You need to delete the deployment before you can delete the PVC because pods uses the claim as volume.
-
Delete the deployment:
-
Delete the PVC:
As soon as the PVC is deleted the PV will also be deleted. The EBS volume will be retained or deleted based on the reclaimPolicy that was set for the StorageClass. In our case, the EBS volume will be deleted.
Verify that the PV is deleted and doesn't exist anymore:
Go to AWS console and verify if the EBS volume was deleted.
Clean Up
Assuming your folder structure looks like the one below:
Let's delete all the resources we created:
References: