Associate Pod With Service Account
Let's see how service account is used to grant pods the permissions to call kubernetes API and manage resources.
Step 1: Create a Pod
Let's create pods. We'll use deployment to create pods:
Apply the manifest to create the deployment:
Step 2: Verify Deployment and Pods
Step 3: Describe Pod
You'll notice the pod has the default service account assigned to it even though we didn't specify it explicitly.
Now, let's take a look at the volume mounts.
You'll observe that token, ca.crt, and namespace files are mounted in the pod at /var/run/secrets/kubernetes.io/serviceaccount.
The tokens are obtained directly through the TokenRequest API, and are mounted at the path /var/run/secrets/kubernetes.io/serviceaccount into pods using a projected volume. Also, these tokens will be automatically invalidated when their associated pod is deleted.
Note
A projected volume is a volume that projects several existing volume sources into the same directory.
By having the service account and token available within the pod, you can utilize them to securely communicate with the kubernetes API or other services that require authentication within the cluster.
Step 4: Verify Volume Mounts
# Start a shell session inside the pod
kubectl exec -it <pod-name> -- bash
# List mounted files
ls /var/run/secrets/kubernetes.io/serviceaccount
You'll see the ca.crt, namespace, and token files as discussed in the previous step.
ca.cert: The trust anchor needed to validate the certificate presented by the kubernetes API Server in this cluster.namespace: Namespace the secret is in.token: A bearer token that you can attach to API requests. This has a structure of a JSON Web Token (JWT).
Step 5: Decode Certificate File
Let's decode the ca.crt file:
Copy the content of the ca.crt.
Visit SSL Certificate Decoder and paste the content of certificate. Next, click on decode.
You'll see the detailed information about the certificate.
Step 6: Decode Token File
Let's decode the token file:
Copy the content of the token.
Visit jwt.io and paste the content of token.
You'll see the detailed information about the token such as expiry (exp), issued at time (iat), issuer (iss), subject (sub) and other details.
Step 7: Access the Kubernetes API
List kubernetes services:
You'll see a service named kubernetes.
The kubernetes service in the default namespace is a service which forwards requests to the kubernetes master ( Typically kubernetes API server).
Now, let's start a shell session inside the container and try to access kubernetes API:
# Start a shell session inside the container
kubectl exec -it <pod-name> -- bash
# Change working directory
cd /var/run/secrets/kubernetes.io/serviceaccount
# Store the token in a variable
TOKEN=$(cat token)
# Verify the content of TOKEN variable
echo $TOKEN
Call the Kubernetes API:
A response from the kubernetes API server is returned with status code 200.
Now, call the v1 API:
Again a response from the Kubernetes API server is returned with status code 200.
Call the pods API:
curl https://kubernetes/api/v1/namespaces/default/pods --header "Authorization: Bearer $TOKEN" --cacert ./ca.crt
A response from the kubernetes API server is returned with status code 403 (Forbidden) and an error message that says:
"pods is forbidden: User \"system:serviceaccount:default:default\" cannot list resource \"pods\" in API group \"\" in the namespace \"default\""
This is because the service account (the identity) the pod uses doesn't have permission to call the pods api.
Here are the steps you can follow to assign permissions to a service account:
- Create a role using kubernetes
Roleobject - Bind the service account to the
Roleusing kubernetesRoleBindingobject
Since default service account is assigned to each pod that is created when you don't provide the service account name, modifying the permission of this service account is not recommended.
We'll create a new service account and then modify permission of that service account.
Let's clean up first:
Step 8: Create Service Account with Permission to Call Pods API
Let's create a service account that has permission to call the kubernetes pods API and then assign this service account to a pod.
1. Create a Service Account
Apply the manifest to create the service account:
Verify the service account:
2. Create Pods
Let's create pods that use the service account we created in the previous step. We'll use deployment to create pods:
Apply the manifest to create the deployment:
Verify the deployment and pods:
# List deployments
kubectl get deployments

# List pods
kubectl get pods
# Describe pod
kubectl describe pod <pod-name>
You'll notice that my-service-account is assigned to the pods.
3. Try to Access the Kubernetes API
# Start a shell session inside the container
kubectl exec -it <pod-name> -- bash

# Change working directory
cd /var/run/secrets/kubernetes.io/serviceaccount

# Store the token in a variable
TOKEN=$(cat token)

# Verify the content of TOKEN variable
echo $TOKEN
Call the Kubernetes API:
A response from the kubernetes API server is returned with status code 200.
Call the v1 API:
Again a response from the Kubernetes API server is returned with status code 200.
Call the pods API:
curl https://kubernetes/api/v1/namespaces/default/pods --header "Authorization: Bearer $TOKEN" --cacert ./ca.crt
A response from the kubernetes API server is returned with status code 403 (Forbidden) and an error message that says:
"pods is forbidden: User \"system:serviceaccount:default:default\" cannot list resource \"pods\" in API group \"\" in the namespace \"default\""
This is because the service account still doesn't have the permission to call the pods API.
4. Create a Role
Let's create a role that has permissions to call the pods API. For this, we need to create a Role kubernetes object as follows:
Apply the manifest to create the role:
Verify the role:
5. Bind the Role to the Service Account
Now, let's bind the role to the service account we created. For this, we need to create a RoleBinding kubernetes object as follows:
Apply the manifest to create the role binding:
Verify the role bindings:
# List rolebindings
kubectl get rolebindings
# Describe the rolebinding
kubectl describe rolebinding my-rolebinding
6. Access the Kubernetes API Again
# Start a shell session inside the container
kubectl exec -it <pod-name> -- bash

# Change working directory
cd /var/run/secrets/kubernetes.io/serviceaccount

# Store the token in a variable
TOKEN=$(cat token)

# Verify the content of TOKEN variable
echo $TOKEN
Call the Kubernetes API:
A response from the kubernetes API server is returned with status code 200.
Call the v1 API:
Again a response from the Kubernetes API server is returned with status code 200.
Call the pods API:
curl https://kubernetes/api/v1/namespaces/default/pods --header "Authorization: Bearer $TOKEN" --cacert ./ca.crt
This time you will get a response with status code 200. This is because the service account the pods use has access to the pods API.
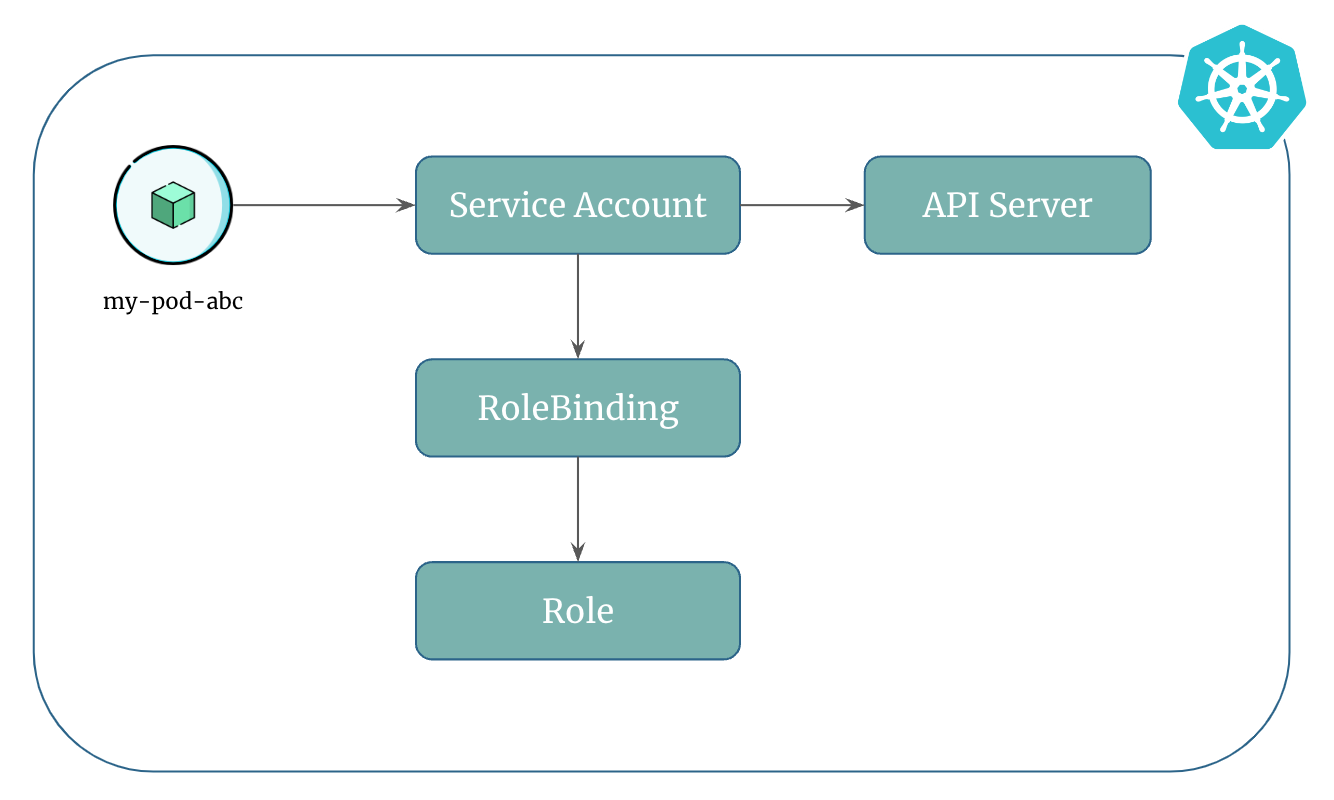
Here's a pictorial representation of how pods use a service account to access kubernetes resources:
Clean Up
Assuming your folder structure looks like the one below:
|-- manifests
│   |-- my-deployment.yml
│   |-- my-service-account.yml
│   |-- my-role.yml
│   |-- my-rolebinding.yml
Let's delete all the resources we created:
References: